After Dan Cederholm made his argument yesterday that CSS “Hacks” should really be called CSS Patches, I decided it was time for me to explain how to make a Drywall Hack…er, Patch! Unlike in pseudo repair jobs done to css to account for browser inconsistencies, this process actually involves making a physical patch for an honest-to-goodness hole in a brick-and-mortar (well, drywall actually) wall.
Exhibit A:
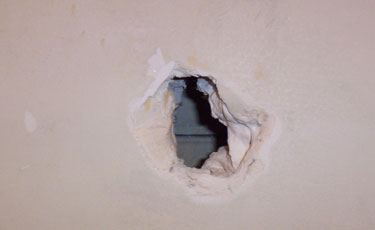
Yes, that’s a hole…in the wall of our upstairs bathroom. Although I’m tempted to say “I’ve always wanted to punch a hole in a wall”, and that “I did it for the sake of this tutorial”, I have to admit that the hole was there when my wife and I moved in. It was actually hidden below 3 layers of wallpaper that we removed, and patched with a business card for a car dealership. No joke…I guess that’s how you know you’ve moved to SC. Being the son of a master carpenter and the son-in-law of a tile mason, I’m not one to resort to shoddy home-improvement techniques so I thought I’d write up a tutorial on how to properly patch a medium-sized hole in a section of drywall. There are many methods to repairing drywall but the technique that I’m going to cover here is often referred to as a California Patch and can be used to repair a hole between studs that is too large to glaze over with drywall putty.
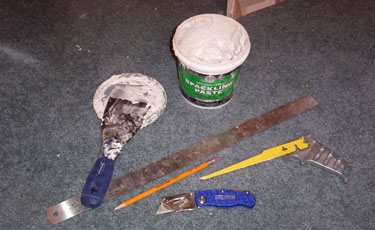
Before we begin, you will need a piece of drywall that is at least 4-5 inches wider and taller than your hole. Often times, if you go to a home-improvement store, they will have broken pieces of drywall that they will give you or sell at an exremely discounted price. I was able to buy a half-sheet (because I know there will be more patches to make before our home improvement is done here) for only $1.02! You will also need the items pictured above:
- Keyhole Saw
- Utility Knife
- Metal Ruler (or T Square)
- Pencil
- Spackling Paste
- Putty Knife
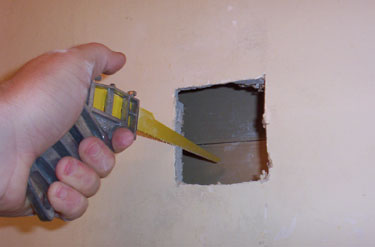
Step 1
With a keyhole saw, cut away any crumbled or damaged drywall around the hole. Try to make your new, larger hole as rectangular as possible.

Step 2
Measure the width and height of the new hole. Draw a rectangle of the same dimensions on the spare piece of drywall and cut it out, leaving about 1 inch around the rectangle. To make a clean cut, score it repeatedly with the utility knife using a metal ruler as a guide.
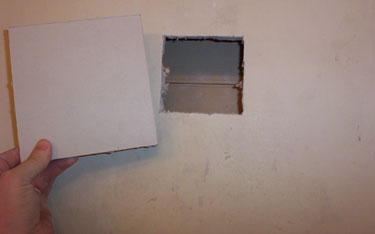
Step 3
Hold up the patch to your hole to visually check to see if the penciled rectangle is about the same size as the hole. It’s a good idea to measure it again just to be sure.
Step 4
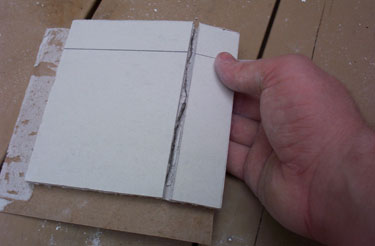
The secret to the California patch is in the fact that drywall has thick paper on both sides. Laying a metal ruler along the line that represents a side of the hole, score across the entire patch, but do not cut all the way through. Once you’ve scored about halfway through the drywall, snap it off like a Kit-Kat bar and peel the gypsum away from the back layer of paper. Repeat the process all the way around the patch as shown above.
Step 5
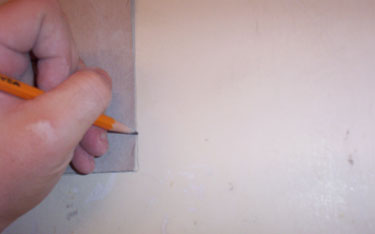
Place the patch over the hole (with the excess-paper-side out) and gently press the drywall “key” into the hole. Do not jam the patch into the hole because we have to pull it back out again in a second. If it doesn’t fit into the whole, trim away at hole with the keyhole saw or utility knife until it does. Once it does fit nicely, pencil around the excess paper and then remove the patch from the wall again.
Step 6
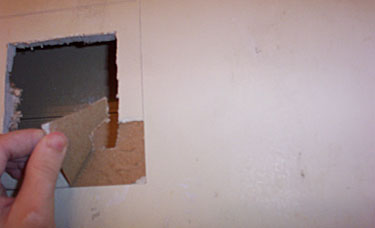
Using a utility knife, score the wall along the lines you created in the previous step. Then, Peel away the paper around the hole. What we’re doing here, is evening out the two surfaces by making it one layer of paper thick instead of two.

Step 7
Using a putty knife, apply spackling paste around the hole and on the patch. Try not to get it too thick where the paper will lie against the wall, but apply a thin layer so that the paper will stick.
Step 8
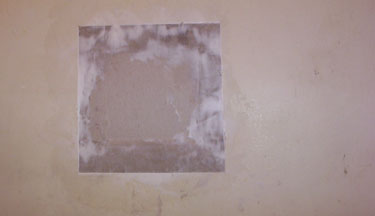
Re-insert the patch into the wall, SLOWLY, just until it feels even with the rest of the wall. At this point, you probably want to give it a few hours to dry so it’s a little more solid to putty over. Once it is, apply a thin layer of spackling paste over the entire patch. Allow this to dry, sand and repeat until the wall is smooth.
That’s it. Once you prime and paint, nobody will ever know the hole was even there. If this was helpful, or if you have any additional tips, please feel free to leave them in the comments below.
Update – 1/27/2007:
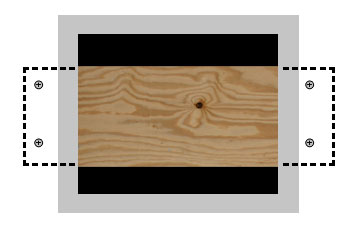
If you are doing this type of patch on a ceiling or anywhere that might need more support, put a scrap piece of wood into the hole as shown in the quick diagram I made below. Use drywall screws to fasten the wood to the existing drywall before putting your patch in and when you’re done, put a couple more screws through the patch and into the wood backer to be sure it doesn’t fall on your head before it dries. I used this method when I removed some old can lights in a hallway and it worked great.
Good Luck! – Jason
Nice trick, but what if—later on down the line when you’ve forgotten about the patch—you go to hammer a nail into the center of it in order to hang a picture frame. Won’t the key just fly backwards through the hole? It doesn’t seem all that sturdy is what I mean.
I guess then you’d have to patch it again. 🙂 Actually, I’ve pushed on the one upstairs quite a bit and it’s pretty sturdy – much sturdier than a business card for sure. Granted it’s probably not tough enough to hammer a nail into, but between the putty dried around the key and the paper that’s plastered to the wall, it’s not going to easily pop through. If the damage was closer to a stud, I probably would have cut my hole over the stud so I could put a couple nails in for support…but even then, you still probably wouldn’t want to hang any pictures on it.
I’ve got a spot behind our front door with a nice, little handle shaped hole thanks to a friend of mine. 🙂 This will be perfect fix. Thanks!
Ara: This is the way drywall is patched. You’d be surprised how sturdy it is; especially a hole that small. Anything you have to edge out with a sawsall is pushing it, of course, and your best bet in that case is to plungecut at the studs.
God. I sound like that dweek on this old house.
Thanks for the great explanation of how to patch dry wall! I have a slightly larger hole in my family room that I will try the technique on…about the size of a 17 year old boy’s fist!
Oh well, a lesson was learned about anger and the apropriate way to vent it and Mom gets to practice some home repair skills again!
Thnaks and good luck to you, Fran
Glad you found it useful Fran. It’s hard to tell from the pictures, but the hole I patched above was about the size of a 17 year old boy’s fist as well…I think. I actually just had to patch another hole recently using the same method. I was taking down the old doorbell chime and discovered that the previous homeowner must have had a hard time getting the thing wired – there was a hole behind it large enough to stick my arm into.
OOPS My husband just informed me that the wall is plaster and not dry wall. What would you recommend here?
Thank you, Fran
I’ve never had to patch a plater wall before. I would do some searching for “plaster wall repair” on Google. The first method on this oldhouseweb.com article is very similar to the one I described above. Depending on the size of the hole, the second method on that page may work as well. Best of luck!
That’s the way I do it too -with one difference. My first step is to cut the patch from the repair material.
With the finish side (white) down, I cut it to my finished repair size using a framer’s square to make sure it has 90 degree corners (size and shape don’t matter beyond that). Then I make a second cut 1.5 inches in from each edge. This cut is beveled outward at roughly 45 degrees, and I go at least 2/3 through but don’t cut the paper.
When I remove the excess gypsum, I’ve got a shape that’s easy to dupilicate on the wall using the framing square and a matching beveled cut (though the wall cut should be at a shallower bevel). It may take a little shaving to get it to drop in, but the bevel will provide hold for the repair like the top of a jack o lantern. The paper margin gives it more strength.
….Another variation (if the above seems too complicated for you -although it’s easier than it sounds): For a bigger patch, do everything as described at the top, but add a couple of slats behind the hole, spanning it in a couple of spots. You can attach it with liquid nails, or drywall screws, then use same to fix the repair in place.
THank you. THis info is extremely useful to a first timer. I have a few holes that are pretty small. In your opinion what is the largest hole I can get away with just filling with putty and not attaching drywall to it?
I’m really not sure…but I wouldn’t try to putty over anything large enough to stick more than one finger through. The problem is that most putty or joint compound shrinks as it dries so you’ll get cracks in it. You can get little kits at Home Depot or Lowes that have a piece of mesh to cover medium sized holes.
Nice explanation. I’d seen others on the web, but had always wondered how they smoothed the hole patch out into the existing wall without creating a lump… removal of the front side drywall paper makes it all make sense.
If you are expecting to hang things in the area (i.e. not behind the bathroom door where the doorknob hits), one could always add the liquid nails and manually counter sunk drywall screws (over which you also puddy) to hold patch in place with lath… which would provide better support.
Thanks.
Thanks for the explanation. I have two holes in my ceiling. Will this method work, i.e. will the patch stay up or will gravity make it fall?
Eh..it’ll probably fall. If not, it may sag down some. On the ceiling you’ll want to put a piece of wood in the hole first to screw the patch to that will prevent it from falling. I’ve updated the post (above) and included a diagram. Best of luck!
Thanks for the great tips. What do you think of this suggestion – instead of tracing the extra paper on the patch to match the paper border you remove on the wall, attach the patch dry with a couple of screws temporarilly, and cut through the paper border of the patch and the wall at the same time. This way the fit will be exact?
Just had the electrician leave. And he left lots of holes in the ceiling. I’m going to try your method and will let you know how they work. Grrrr. Stupid electrician.
Just had the electrician leave. And he left lots of holes in the ceiling. I’m going to try your method and will let you know how they work. Grrrr. Stupid electrician.
hey guys…and gals, iv’e done some extensive patchwork for friends and neighbors,
i’ve run into a problem….after multiple patch’s on one wall..a dozen, i decided to mud the entire wall…like plaster..had to sand it twice but it came out really smooth with no imperfections. problem:when my friend painted it the paint clumped on the wall, is this from dust on the wall?, how do i fix that?
hi again, one other thing… I have always…always found it better to put some kind of wood behind a large patch(fist size or larger).
and never nail into drywall… always use screws.
Yea, I’m almost certain that paint clumping would be due to drywall dust. Try wiping down the entire area you plan to paint with a damp rag. Also, using a good shellac based primer is a good idea when painting over large areas of joint compound. I typically use Zinsser BIN primer/sealer.
I hope this works as I am trying it right now. Seems like a neat fix. Glad for the help. Moving couch up the stairs and it got stuck. Major damage to my walls with one big hole.
hi i read what u wrote bout patching a drywall n it worked great 4 being my 1st time ty
Two tips that may improve this technique; To strengthen the patch glue it in with contact cement, also cut the corners of the paper flap in a rounded shape, the sharp corners sometimes will not lay flat. I have used this technique and these extra tips… they work very well.