
Before we dive in, I should let you know that I’m a designer. I have no business hacking firmware to make devices perform jobs they were never intended for, but I do love tinkering with physical hardware. A few years ago, I wrote about building an Arduino LED strip game and followed that post up with another about a Simon clone built with arcade buttons and a 3D printed case. I’ve also taken on some Raspberry Pi projects, a few simpler Arduino builds, and some home automation. All of those were based on existing code and project plans—no compiled binaries or firmware modifications. So, yes, I was way outside my skill set and comfort zone on this project, but that’s how we learn new things, right?

On October 25th, Google officially ended support for 1st and 2nd generation Nest thermostats. I’ve long been a fan of the original Nest hardware, so after replacing our gen2 with a newer smart thermostat, I decided to hang on to that beautiful hunk of e-waste. A few months later, I came across Cody Kociemba’s No Longer Evil project. It’s an open-source firmware that brings deprecated gen1 and 2 Nests back to life by redirecting the device’s traffic away from Google’s servers and providing a web interface for remote HVAC control and scheduling.
While I never intended to use my old Nest as a thermostat again, I figured it might be fun to see if I could modify the custom firmware to do something interesting. Installing the NLE firmware involves putting the Nest into DFU (Device Firmware Update) mode and running an installer script over USB. That sounds complicated, but the installation process is well-documented and straightforward.
As soon as I saw the NLE logo, I was curious what else I could put on that little circular screen. It’s just a 320×320 IPS display, but the pixel density certainly looked like it might handle a photo reasonably well. For my first experiment, I set out to try finding the NLE logo image and replacing it with a photo. After digging around in the open source project a bit, I worried this was going to absorb more time than I was willing to spend on a silly side project.
Diving into Claude Code
This seemed like a perfect challenge to pair with Anthropic’s Claude Code on, so I re-upped to Claude Pro, opened a Terminal window, and started prompting. With the help of my handy robot assistant, I learned that the display is accessible as a standard framebuffer device at /dev/fb0, which means if you have some raw pixel data, you can just write it directly to the screen. It helped me track down where the .ppm logo file was located in the open source code, convinced me that a BGRA .raw file was a better format for displaying photos on the device, and walked me through gaining root access to upload and display a proof of concept photo that I formatted and resized down to 320px with ImageMagick.

Even though it was tiny, the photo looked great in that circular glass frame, so from there, I decided to try making it work as a photo gallery that cycled through images automatically (and yes, Tynan) allowed for manual scrubbing via ring turn. While I may have been able to figure out how to get the POC photo to display on my own, the rest wouldn’t have been possible without Claude Code. It wrote all of the gallery functionality and helped me set up Docker to compile and reflash the Nest with test builds.
I worked with Claude as if I were a product manager—providing feature requirements, validating incremental changes, and giving direction when we encountered technical constraints. And boy, did we encounter some constraints. The Nest Gen 2 runs a Texas Instruments ARM Cortex-A8 processor with a Linux 2.6.37 kernel from 2011. Just figuring out how to get a turn of the ring to swipe photos across the screen took some trial and error, device crashes, and several moments where I was sure we’d permanently bricked it.
The first major hurdle was convincing the Nest to give up control of the screen. A process called nlclient continuously redraws the thermostat interface, and a watchdog process prevents you from killing it without forcing a reboot. I was getting frustrated with frequent gallery flickers and crashes when Claude eventually figured out that it could use SIGSTOP to keep the watchdog process alive and prevent the Nest from redrawing. With each successful milestone, I’d remind Claude of another missing aspect of the project. Here’s a sample of what our interactions looked like: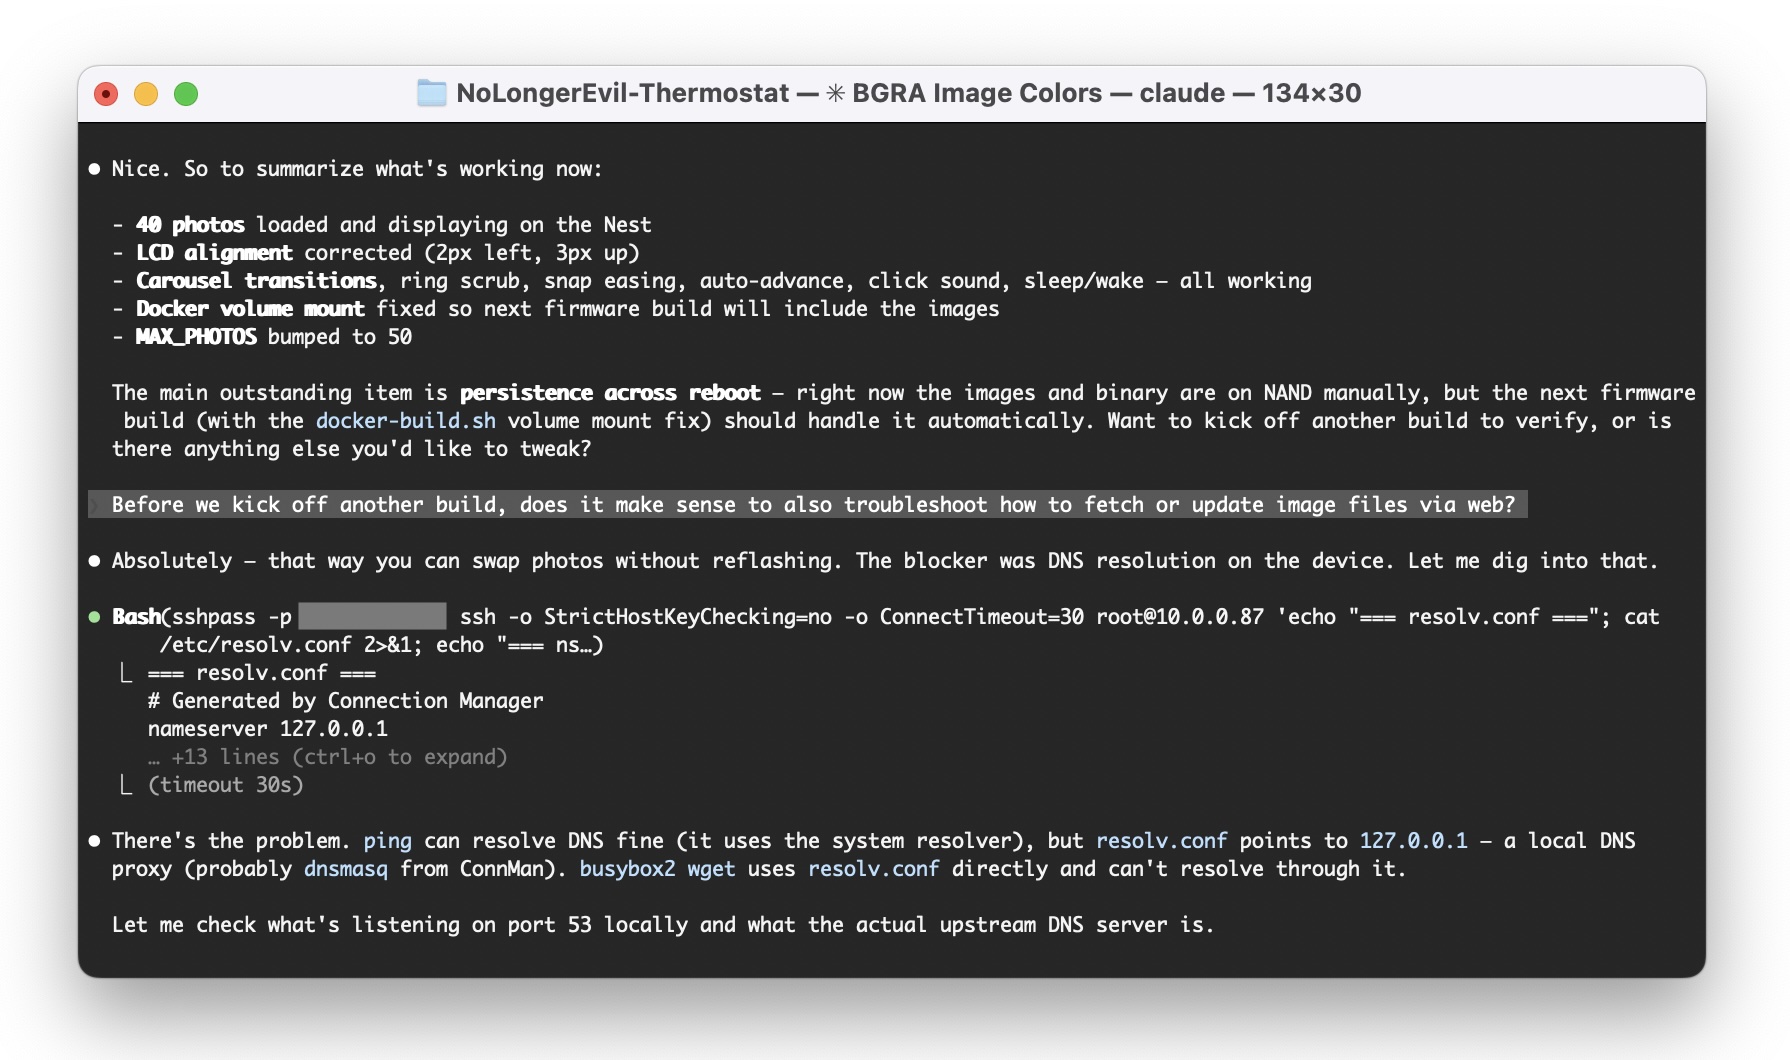
The solution to the issue Claude was working through above also required a few iterations. I wanted to be able to add and remove gallery images without having to reflash the device. To do that, I uploaded them to a folder on my site, but there was no DNS resolution, and it also couldn’t pull files over HTTPS. Instead of letting Claude write its own musl-based wget/curl service with HTTPS support, I suggested that I could set up a subdomain without an HTTPS cert to store the photos on. There were several moments like this over the course of the project, where Claude Code was spiraling through a series of Rube Goldberg solutions to the technical constraints we encountered. Sometimes I redirected, and sometimes I let it cook. I’m pretty happy with how it turned out. Here’s a summary of what we built together:

- Auto-advance gallery – Once the Nest completes its boot sequence, it starts cycling through photos, displaying a new one every 10 seconds.
- Display sleep – After 5 minutes of inactivity, the screen dims to conserve power. You can tap the button or turn the ring to wake it.
- Horizontal carousel – Turn the ring and photos slide left or right in real-time, matching the feel of scrubbing through settings on the original Nest UI.
- Motion wake – When the gallery is not active, the Nest UI is running in the background. When we detect a motion event (AKA, Farsight), we take over the display with a random image from the gallery. If no additional action is taken within 10 seconds, the display goes back to sleep.
- Snap easing – If you stop turning the ring past the midpoint, the image slides into place with an ease-out animation.
- Lazy Loading – I initially let the gallery cache up to 40 images (~16MB) in memory at once. While troubleshooting periodic reboots, I learned that we were exceeding the device’s 41MB RAM limit. Now, we store 7 images in memory (3 ahead and 3 before the current image), to keep the scrubbing snappy, loading additional images on demand.
- Web Update – On each non-motion wake action, the gallery checks an online playlist file, downloads missing images, and removes photos that are no longer on the list.
- Click sound – The Nest has a tiny piezo buzzer, so with every ring-turn photo transition, you get a satisfying little 8-bit beep.
- Gallery pause – A double-click on the button switches between the photo gallery and the original thermostat UI. This allowed me to get into settings to check things like wifi connection and device wiring status.
To mount the Nest back on a wall, I needed a power source. I learned that a standard 24VAC doorbell transformer (which I found for about $12 on Amazon) plugged into the R and C ports of the base could keep the zombie thermostat Nest alive. I found an ideal display location near an entry door next to the library ladder room. There’s a closet on the other side of the wall with an outlet close enough to run a cord up, through the wall, and straight into the Nest backplate for a clean look.
The one issue I didn’t solve
There’s a tiny flat spot at the very top of the display (maybe 1-3 pixels) that’s visible on lighter-colored photos. You can barely see it in the video, and even the NLE logo photo above from the original firmware flash. Claude tried to convince me that it was a hardware notch, but in the white background of some of the Nest UI screens, all the pixels are lit up to form a perfect circle. I spent an embarrassing amount of time prompting and reprompting Claude to try different pixel offsets and framebuffer pan settings to round out that glitch. While nobody who checks out the gallery will ever even notice the tiny top divit, it makes my eye twitch every time, so I may eventually try again to troubleshoot it. Until then, I’m calling this project done.
This is amazing, Jason! Fab example of up-cycling with AI! Thanks for sharing your adventures. And I would be bugged by that flattened top of the circle, too, haha
It’d be super cool if you got this to integrate with Immich so you wouldnt have to load photos onto the Nest and just keep them on a NAS
That’s hard because the Nest is unable to display standard image formats (like jpg, gif, png, etc) or handle the conversation to 320×320 BGRA itself. I’m working on packaging this up with a script that will format and install a set of images you provide at install (without having to rebuild the project in Docker) with the option of pointing it to a web folder like I’m doing to swap out images on the fly.
Super cool! Now add a battery and make it a necklace or large banger watch. Ha ha! 😉
The device comes with a built-in USB rechargeable battery and will run for maybe an hour or more.
As for getting more photos into the device. Could it SMB or NFS mount a folder from your NAS of preformatted images? If it can do mounts, storage is unlimited.
The battery capacity was very helpful while I was iterating on this project, but now it just lives permanently on the wall, powered by the doorbell adapter I mentioned above.
There are many options for unlimited gallery storage if you can preformat the images. What I ended up going with for the installer was a utility that handles formatting batches of jpg or pngs and adds them to your on-device gallery via SSH. I wrote about that in a follow-up post:
https://jasongraphix.com/journal/create-your-own-nest-photo-gallery/
The whole project is now public if you’d like to try it out or explore modifying the firmware to add SMB or NFS connection:
https://github.com/jasongraphix/nest-gallery
Great idea but near impossible to implement from github – there are too many dependencies in your code that cannot be resolved – referenced to /tmp/$$$ in search of html files, etc. negates use of the installer. Building the installer fails after days of effort trying to resolve all the npm version conflicts. It is close, but there are so many fundamental pieces that simply fail.
Hey Jim, thanks for reaching out and happy to help if I can. I haven’t iterated on the project in a while, but my Nest just went back to the stock UI and I reflashed it with the April arm64 release and have tested it on 2 different Macs. It shouldn’t be referencing anything local. If this is happening on the Linux appimage, the build process still runs on my dev machine, so I can try to troubleshoot any issues you’re having. I’ll send you an email.